
Optimize Images for the Web:
A Non-Designer’s Guide to Awesome Web Graphics
Learn How to Create Custom Web Graphics that Look Great and Load Fast
Need to Download PaintShop Pro?
Download a Free 30-Day Trial Now!
Table of Contents
Are you creating graphics for a website but don’t know where to start? Don’t be discouraged. Even non-designers can create and optimize images that look nice and load fast. (We’re biased, but we love PaintShop Pro to get this done!) This guide will provide everyone from beginners up to print designers with a basic understanding of the technical requirements to make and optimize images for the web.
What to Expect
First, we’ll cover common file types and what is appropriate for your project. Next, we’ll talk about the three main components of a well-optimized image: quality, color and size. Along the way, you’ll learn the difference between graphics created for printed materials vs. digital projects.
You may notice some info is repeated throughout this guide. There’s a reason. It’s really important. Image optimization is very important!
File Types
If you want to create a document, you’re most likely to use a word processing program. These programs create specific types of files based on what they’re being used for.
When it comes to graphic design, you’ll need a graphic design program to make your images. Web graphics require certain file types in order to render (appear) on the screen properly. Here is a description of common file types and when you should use each one.
PNG
Portable Network Graphics (PNGs) are popular because of their high quality. But that quality comes at a price, namely a larger file size. (We’ll discuss quality in more detail a little later.) Since larger file sizes mean longer loading times, they are not always right for the job. If you are creating graphics that include text, PNGs work well.
GIF
One of the oldest web-based file types is the Graphics Interface Format (GIF). These 8-bit images are popular because they allow you to create simple animations. Because they don’t have a large color palette or high pixel depth, they are not the right choice for photographs or detailed images.
Need to Download PaintShop Pro?
Download a Free 30-Day Trial Now!
JPG
The most popular image type was created by the Joint Photographic Standards Experts Group (JPEG). Smartphone and digital cameras both shoot in JPG format. These files are great for photos, but they lose quality.
If you plan on editing an image several times before posting on your site, each time you save you will lose quality. Your best bet is to edit the image in another format, and then convert the final version to JPG.
Other File Types
While a variety of other image types exist, they are not supported for viewing on the internet. TIFF images are high quality graphics often preferred over JPGs because they don’t lose quality. But, they will not show up on a webpage.
Some animated graphics, like Flash, will show on webpages if the user has the appropriate extensions. Presentation graphics like those from SlideShare or videos from sites like YouTube and Vimeo may be embedded onto a page for proper viewing.
Image Quality
Quality (from a technical standpoint) is not always as critical as we think. As we mentioned before, there is a bit of a trade-off involved. The higher quality an image, the larger the file size. Because loading speed is one of the most important aspects of your site’s user experience, save all images at the lowest quality necessary to look good on the screen.


The first way to ensure your images look good is to choose the appropriate file type. While PNG files typically have the highest quality, only use it if your image details won’t show up in other formats. These create the largest files, so are the slowest to load.
And even though it’s true computers are infinitely more powerful than the ones we used five years ago, mobile users need smaller sized images to keep loading time at a minimum.
JPGs are sufficient for most files. The only times you wouldn’t use JPGs is if:
- You need to save the images over and over again
- Details like small text don’t show up properly
If you’re creating graphics that will be professionally printed, these require higher quality than web graphics. Make the graphics for print first, then save down to a compatible version.
Don’t compromise your site load time for massive images. Both physical size and file size play a part in how long files take to load. Experiment with image quality, and look at your final version on multiple screens, including HD displays, before committing to a format and size.
A couple of tricks to cut down on loading time are by creating images with progressive previews. These images come in fuzzy at first, but increase in quality as the page finishes loading. Companies like Medium and Facebook also use code to swap out a lower quality image for a higher one as loading finishes.
Need to Download PaintShop Pro?
Download a Free 30-Day Trial Now!
Color
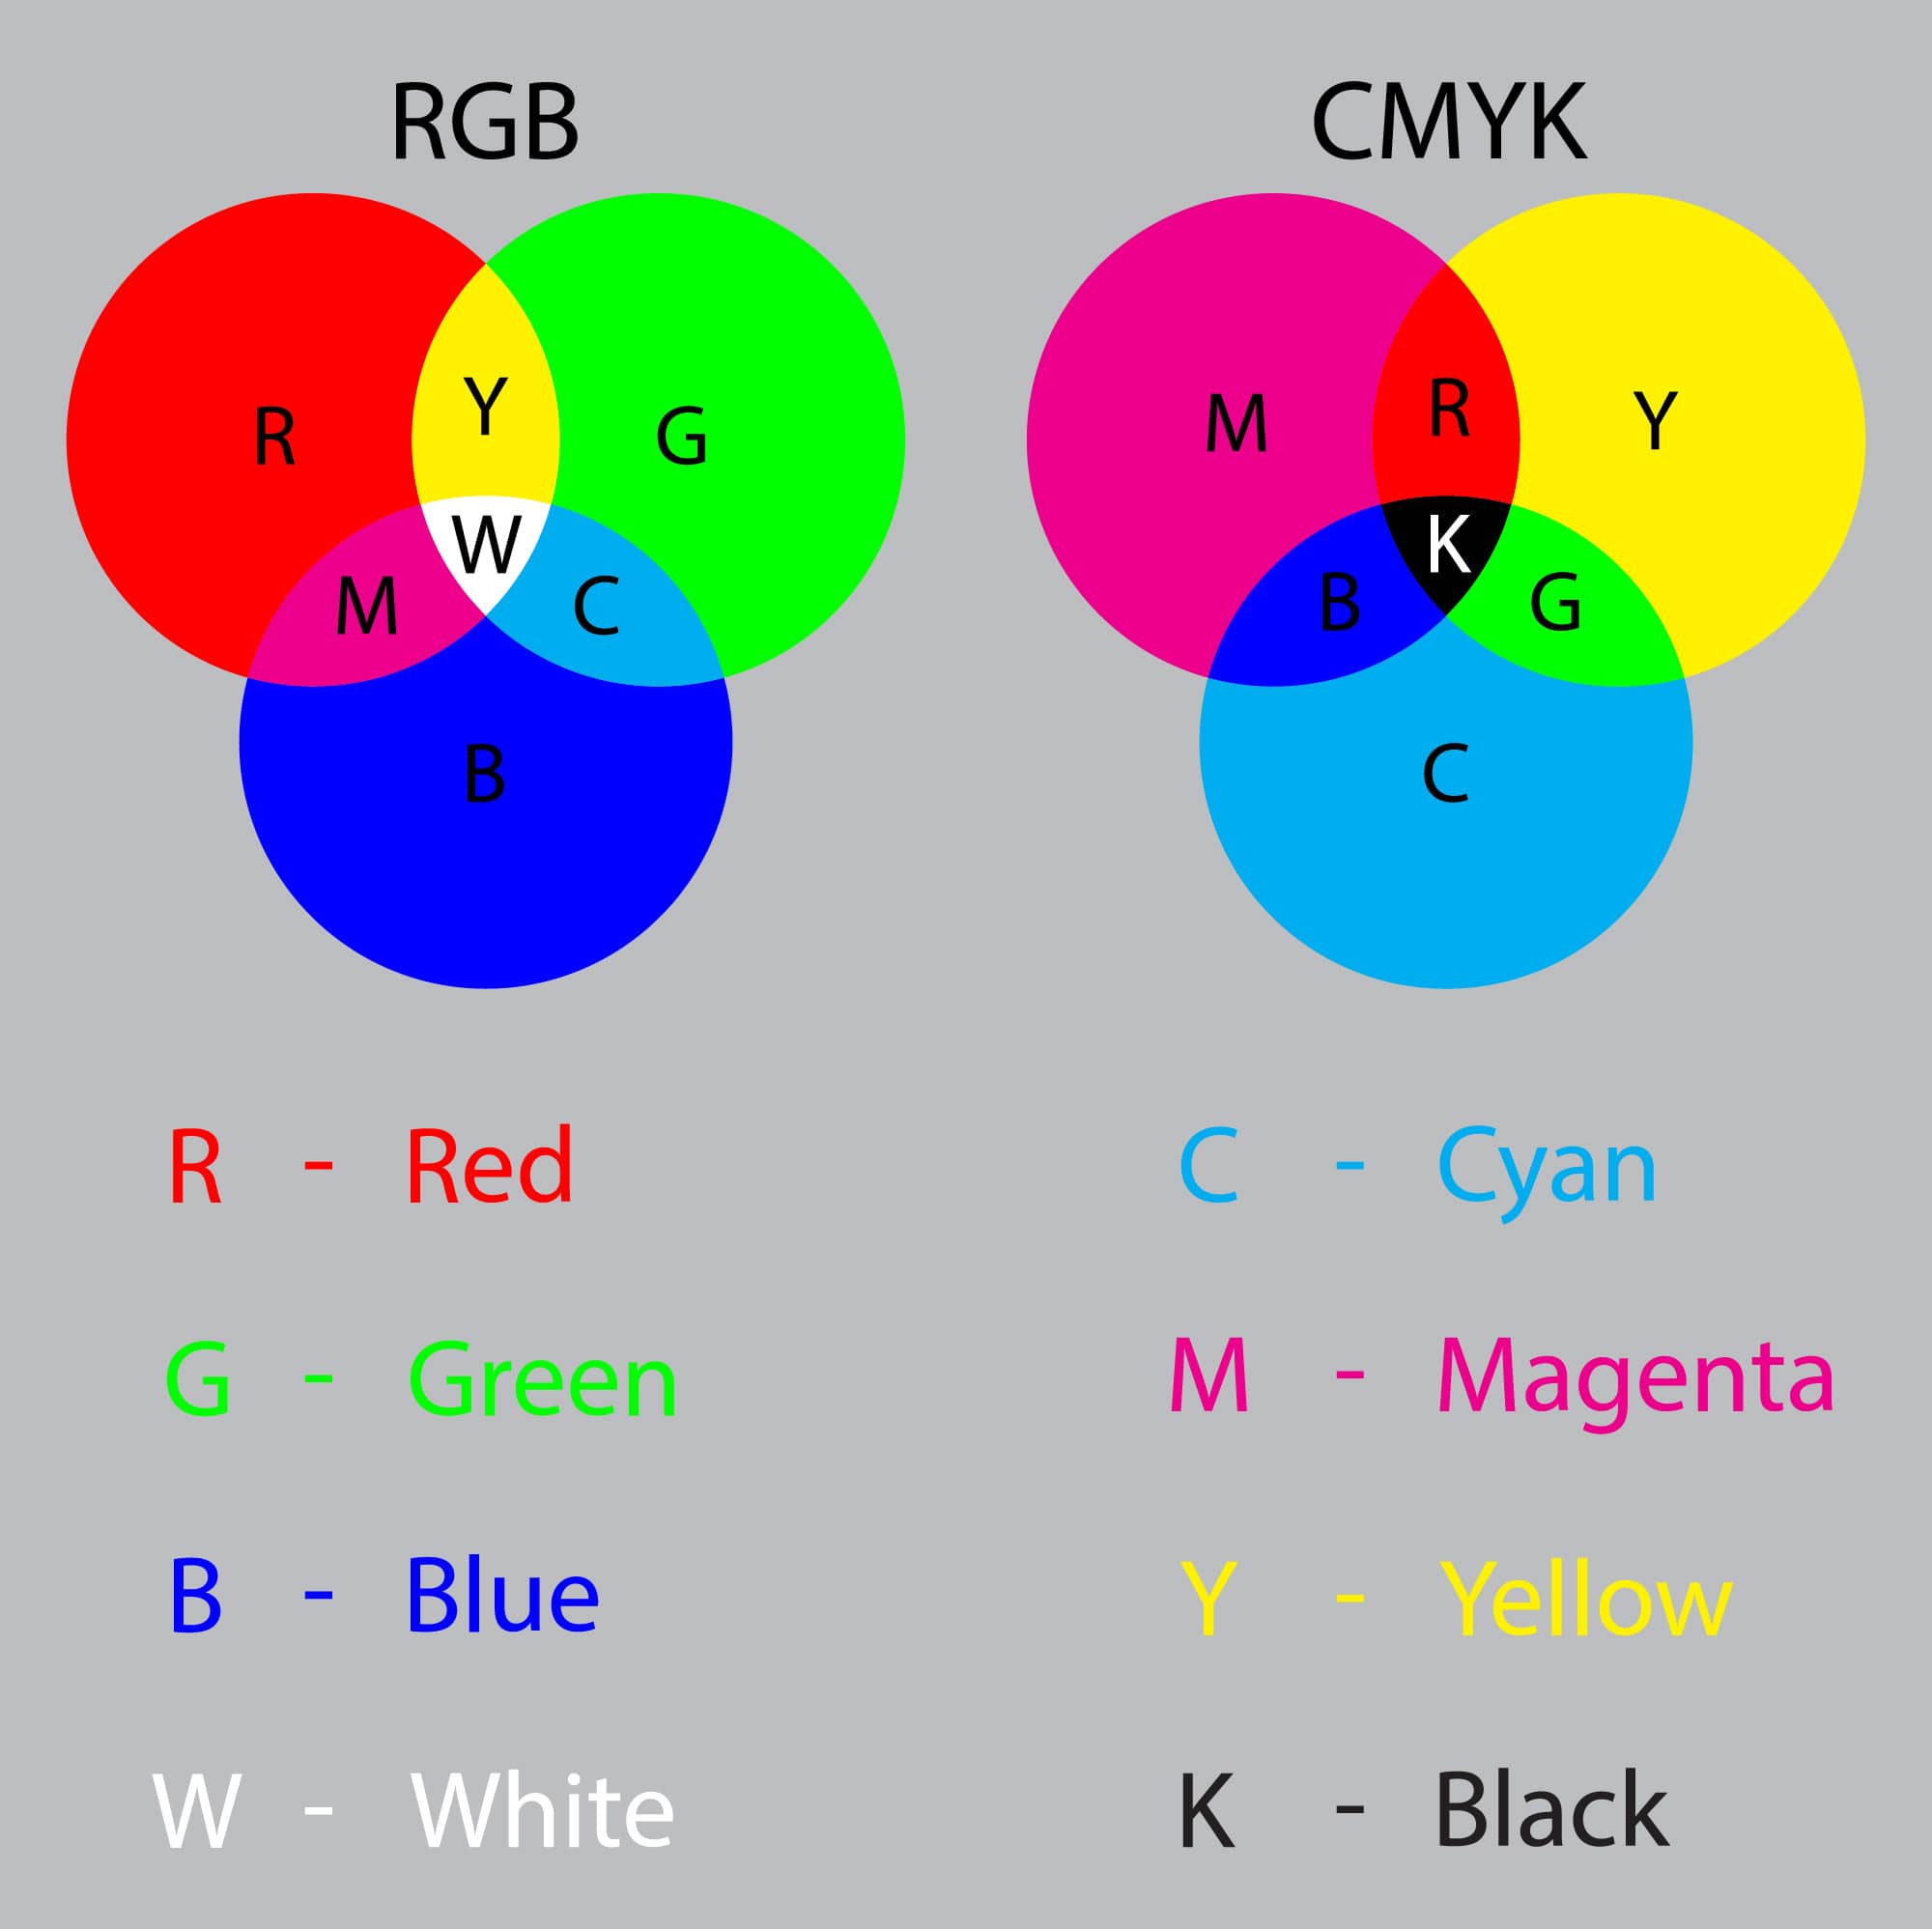
In graphic design, a number of color models exist. Here we’ll focus on the two major players: CMYK and RGB, although, we would never recommend CMYK for optimized web images.
CMYK
NOT RECOMMENED FOR WEB GRAPHICS
Cyan (C), Magenta (M), Yellow (Y) and Black (K) are the four major colors used in printed materials. When light reflects off the ink drops, it makes up the various colors you see. CMYK has a smaller range of colors available than RGB. Colors usually appear darker when printed than on the screen.
Because less colors are available, commercially printed materials rarely match digital ones. Use a color matching system, like PANTONE, to find shades that will look the same on screen and in print. This system is different from both CMYK and RGB, but can be translated to values for both color models.
RGB
Red (R), Green (G) and Blue (B) make up all the colors in the RGB color space. Unlike CMYK, where 100 percent of all shades equal black, combining all three colors in the RGB spectrum create pure white. RGB color is created when light passes through pixels, allow for a much wider variety of colors.
There are literally millions of colors available in the RGB color space. This makes it the model of choice for photographers and fine artists.
HEX Color System
In order to create web images with specific colors, you’ll need to familiarize yourself with the HEX (hexadecimal) color system. HEX codes are comprised of a hashtag followed by six digits. The first two digits correspond to the red value, the middle two to the green and the last two to the blue.
Web developers use these codes in HTML and CSS to assign background and element colors on web pages.
Choose a color palette of HEX codes for consistent color throughout your entire website.
Size
There are two types of sizes to consider when constructing images for the web: physical size or resolution and file size.
Physical size directly affects file size. As we’ve mentioned before, smaller files load faster. So it’s critical to appropriately size graphics to keep loading time minimal.
Physical Size
Resolution is often mentioned when speaking of image quality. While it’s true resolution is the amount of detail an image holds, pixel resolution refers to the physical size of an image. Windows file browsers give this measurement in the properties section of a file, including both the width and height of an image.
Pixels are the unit of measurement in digital images. When creating a web image in a specific layout, save it in the exact size it needs to be for normal displays, and 2-3 times the required size for high resolution applications. Web developers normally create file names ending in @2x or @3x to designate that these graphics are high-quality copies.
Need to Download PaintShop Pro?
Download a Free 30-Day Trial Now!
Web developers sometimes code when to swap an image for the high-quality version directly into the website, which keeps loading times short for non-HD devices.
If working with WordPress, the software automatically saves three versions of each image to the library when uploaded. But using small and medium versions of these images in the layout creates more work than necessary and can bog your site down.
Stick with manually resizing your images. If your image space is 200x600 pixels, create an image exactly that size (and larger if creating for HD).
File Size
User experience is the mantra of web developers everywhere. Sites are constantly tested for ease of use, and loading time is a huge part of this testing and the subsequent image optimization. That’s why it’s important to use appropriate file formats to create images with the smallest possible file sizes.
To keep file sizes at a minimum, follow these best practices:
- Used compressed file formats like JPG whenever possible.
- Create images exactly the size they need to be.
- Experiment with quality settings in your graphic editing program. Medium quality is often more than suitable for web images.
Conclusion
We’ve covered a lot of ground in this guide. Be proud of yourself! Now that you understand what it takes to create great web images, get going!
Nothing helps you understand what you’ve learned better than putting it to use right away. The three most important points to remember are:
- Use appropriate file types.
- Create in RGB color.
- Keep your file size as small as possible.
While this guide didn’t teach you to judge the aesthetic quality of your images, we hope you gained a better understanding of how to optimize images and what makes technically correct and fast loading web graphics. Happy image optimization!
Need to Download PaintShop Pro?
Download a Free 30-Day Trial Now!